

The Back Story
Not interested and just want the build details?
A long time (15 years?) ago, I stumbled upon the fornobravo.com website their recently released DIY Pompeii oven plan. Within no time I knew that I had to build a wood fired pizza oven! To make a long story short, I began researching the design, making modifications and drawing up my own plans and following along at Forno Bravo as others embarked on the same journey. The only difference? They got “permission” to build their ovens and I spent the better part of 15 years working on other projects, dreaming of building mine and being jerked back to reality with the words “Absolutely not, no more big projects until all of the other projects are done!”
Covid-19
Enter Covid-19 and the fact that 15 years have passed… I decided that a summer of lockdown was the perfect time to build a wood fired oven. I asked… she said “no.. well maybe…” I took the “maybe as a YES and started ordering supplies before I was told “NO”.
One problem! Covid lockdown made getting just about any building materials here in Pittsburgh impossible, especially hard to find items like fire brick and refractory mortar and insulation. Moreover, at 49 years old, I have cut more than enough tile, stone and brick than I care to remember and don’t need to pat myself on the back for cutting a few hundred fire brick to size for a Neapolitan style pizza oven dome.
I remembered that during planing Forno Bravo toyed with the idea of selling pre-cut firebrick. A quick call to them revealed that these brick kits really never came to fruition.I did find the flamesmiths.com website, a US branch of the Melbourne Firebrick Company. The website showed a Pompeii style pizza oven kit. I was skeptical of availability given Covid, the fact that it was from Australia, and it being VERY niche product. Honestly, I assumed it was a website advertising something that didn’t really exist or have any availability! I called the US number on the flamesmiths.com website and left a message.
Melbourne Firebrick Company
Enter Ben Guilford, the president and owner of the Melbourne Firebrick Company. Shortly after leaving the voicemail, I was greeted by a call from Ben at his office in… Melbourne! Not only was he extremely kind and eager to answer my questions, he told me that he had just shipped several D105 Brick Oven kits to his New Jersey depot and could have one at my doorstep as soon as I was ready!
The D105 Kit: I will not go into a lot of the kit detail (the flamesmiths.com website has all of that) other than to provide my decision process. Quite simply the D105 follows the same design principles as the free Forno Bravo Pompeii oven plans, incorporating most of the community improvements and Ben’s own improvements over the basic design.
Hand crafted: So the kit is basically just pre-cut medium duty firebrick and the other raw materials that I would have to source individually anyway. The only real difference between my original plans and using the kit, is that somebody cut the firebrick for me and put everything else I needed in one convenient box! So I get the hand crafted oven I want and don’t have to chase down materials or mindlessly cut hundreds of brick!
Cost: I spent close to $3,000 on the kit delivered to my driveway in a HUGE well made shipping crate. The premium for the convenience, especially given Covid availability and pricing? I did a quick back of the napkin calculation and came up with $1800-$2200 with problematic lead time to boot. To me, spending $900 for the convenience and time was a no brainer!
Wood Fired Pizza Oven Build Notes
I do not intend to detail every aspect of this build, as there are numerous other sites and resources that do that very well. Instead, the goal here is to both highlight some of the major milestones of the build, and explain some of the methods used to achieve the desired end result. As mentioned much of the planning was done beforehand using other’s plans and my own CAD drawings. That said, there were many “cross that bridge when I come to it” type of on-the-fly design changes and additions.
The wood fired oven build can be broken down into these major milestones/components
- Footer and Foundation
- Oven Stand
- Hearth Slab
- Brick Oven (floor, dome, entry arch, etc)
- Oven Insulation
- Oven Enclosure (gable house)
- Slate Roof
- Chimney and Flashings
- Stone Veneer and Landing Stone (Mantel)
Footer and Foundation
A stable foundation is not hard to achieve for most wood fired oven projects. In most cases a modestly reinforced concrete slab will suffice for even the largest of oven projects. The chosen location for my project posed a somewhat more complex problem to solve. The chosen oven location is a poorly drained part of my yard, consisting of mostly expansive orange clay that extends far below frost depth. I feared a floating slab would, regardless of base prep, eventually shift and tilt due to freeze thaw cycles and the ever-trapped moisture.
My solution (likely overkill) was to build a traditional footer and foundation below the 36″ regional frosts line. This proved to be one of the hardest parts of the project. I hand shoveled for days in the hard clay. The footer is ~10″ thick and 162-” wide with 3/8 rebar on chairs. I used a portable mixer and roughly 40 #90 pound bags to create the footer.
The primary concern with the foundation was that I had nowhere to place a drain tile, as the 36″ depth would mean digging a 100+ foot trench to daylight through existing patio, walkway and landscaping features.
I set the below grade foundation using 8″ standard CMU units. I chose to fill the foundation block cores with concrete in hopes of preventing (the surely to be trapped water) from freezing and disintegrating the block. I had actually planned on eliminating the issue by pouring the below grade walls but frankly didn’t want to deal with further excavation to accommodate the required formwork.
During the core filling, 3/8″ vertical rebar was set to reinforce the sub grade foundation. These vertical rebar were left high enough to secure the above grade stand walls and act as the vertical members of the stand’s rebar reinforcement grid.
Stand Construction
The above grade walls were hand mixed and poured around 3/8″ rebar reinforcing grid that was tied to the aforementioned vertical rebar extending from the below grade block foundation. Looking back, I should have simply laid more block. I chose the poured walls for strength at 4″ thick compared to the space 8″ block would have taken. This also give me a ~4″ brick ledge around the perimeter. More vertical rebar was added to be later bent over and act as the basis for the hearth slab reinforcing grid.
While not a mistake, the formwork was expensive and hand mixing another 40 #90 bags of concrete was unpleasant, to say the least. As robust (and expensive) as the formwork was, the forms were barely adequate in preventing bowing and deformation of the stand walls! I also ended up purchasing a 5 gallon bucket of commercial form release agent from a local concrete supply house. Sadly, “DIY” quantities of form release are hard to find and DIY solutions (no pun) like motor oil, pam cooking spray, diesel fuel, etc. have limited efficacy or serious (long lasting oder) drawbacks.
A note on the formwork. As I mentioned, it was expensive, heavy and barely up to the task. I built it in a modular fashion using rebar as corner pins. The goal was easy removal and reuse when reattached 6″ higher to be used as the slab form. This worked out very well.
The front wood storage arch form was built using a simple template covered with hardboard (Masonite). This worked out extremely well.
If I were to do this again I would have ordered a meter truck and poured the walls and hearth slab at once. Figuring out how to make easily removable inner formwork was the hurdle that prevent me from heading down this path originally.
Hearth Slab
At this point, the project was starting resemble a bunker or bomb shelter, so much so that several neighbors actually asked if we were making a bomb shelter or safe room!
In keeping with the spirit of over-engineered – I used worst case load numbers for a 2 way reinforced slab and built a tied reinforcing mesh for the pour. I consoled myself by repeating “rebar is cheap in the scheme of things”. The existing wall forms were reattached and raised up 6″ to form the pour and this time I called a metered concrete truck. Two reasons for the commercial concrete delivery. 1) I was tired of mixing 90 pound bags and 2) I was worried that the elapsed time between bag one and bag 30 would create uneven drying and/or cold pour cracks. In the end I ended up with a reinforced slab that would likely hold up under the weight of an M1 Abrams Tank in an 9.0 earthquake.
Joking aside, I have seen numerous WFO builds where the slab has cracked and sagged and in some cases caused preventable cracks in the oven or decorating veneer. I opted to actually do load calculations and pour the hearth slab according to the worst case load. I could have used less smaller rebar and a bit more spacing in the the 6″ thick slab, but the savings were minimal at best for this size project.
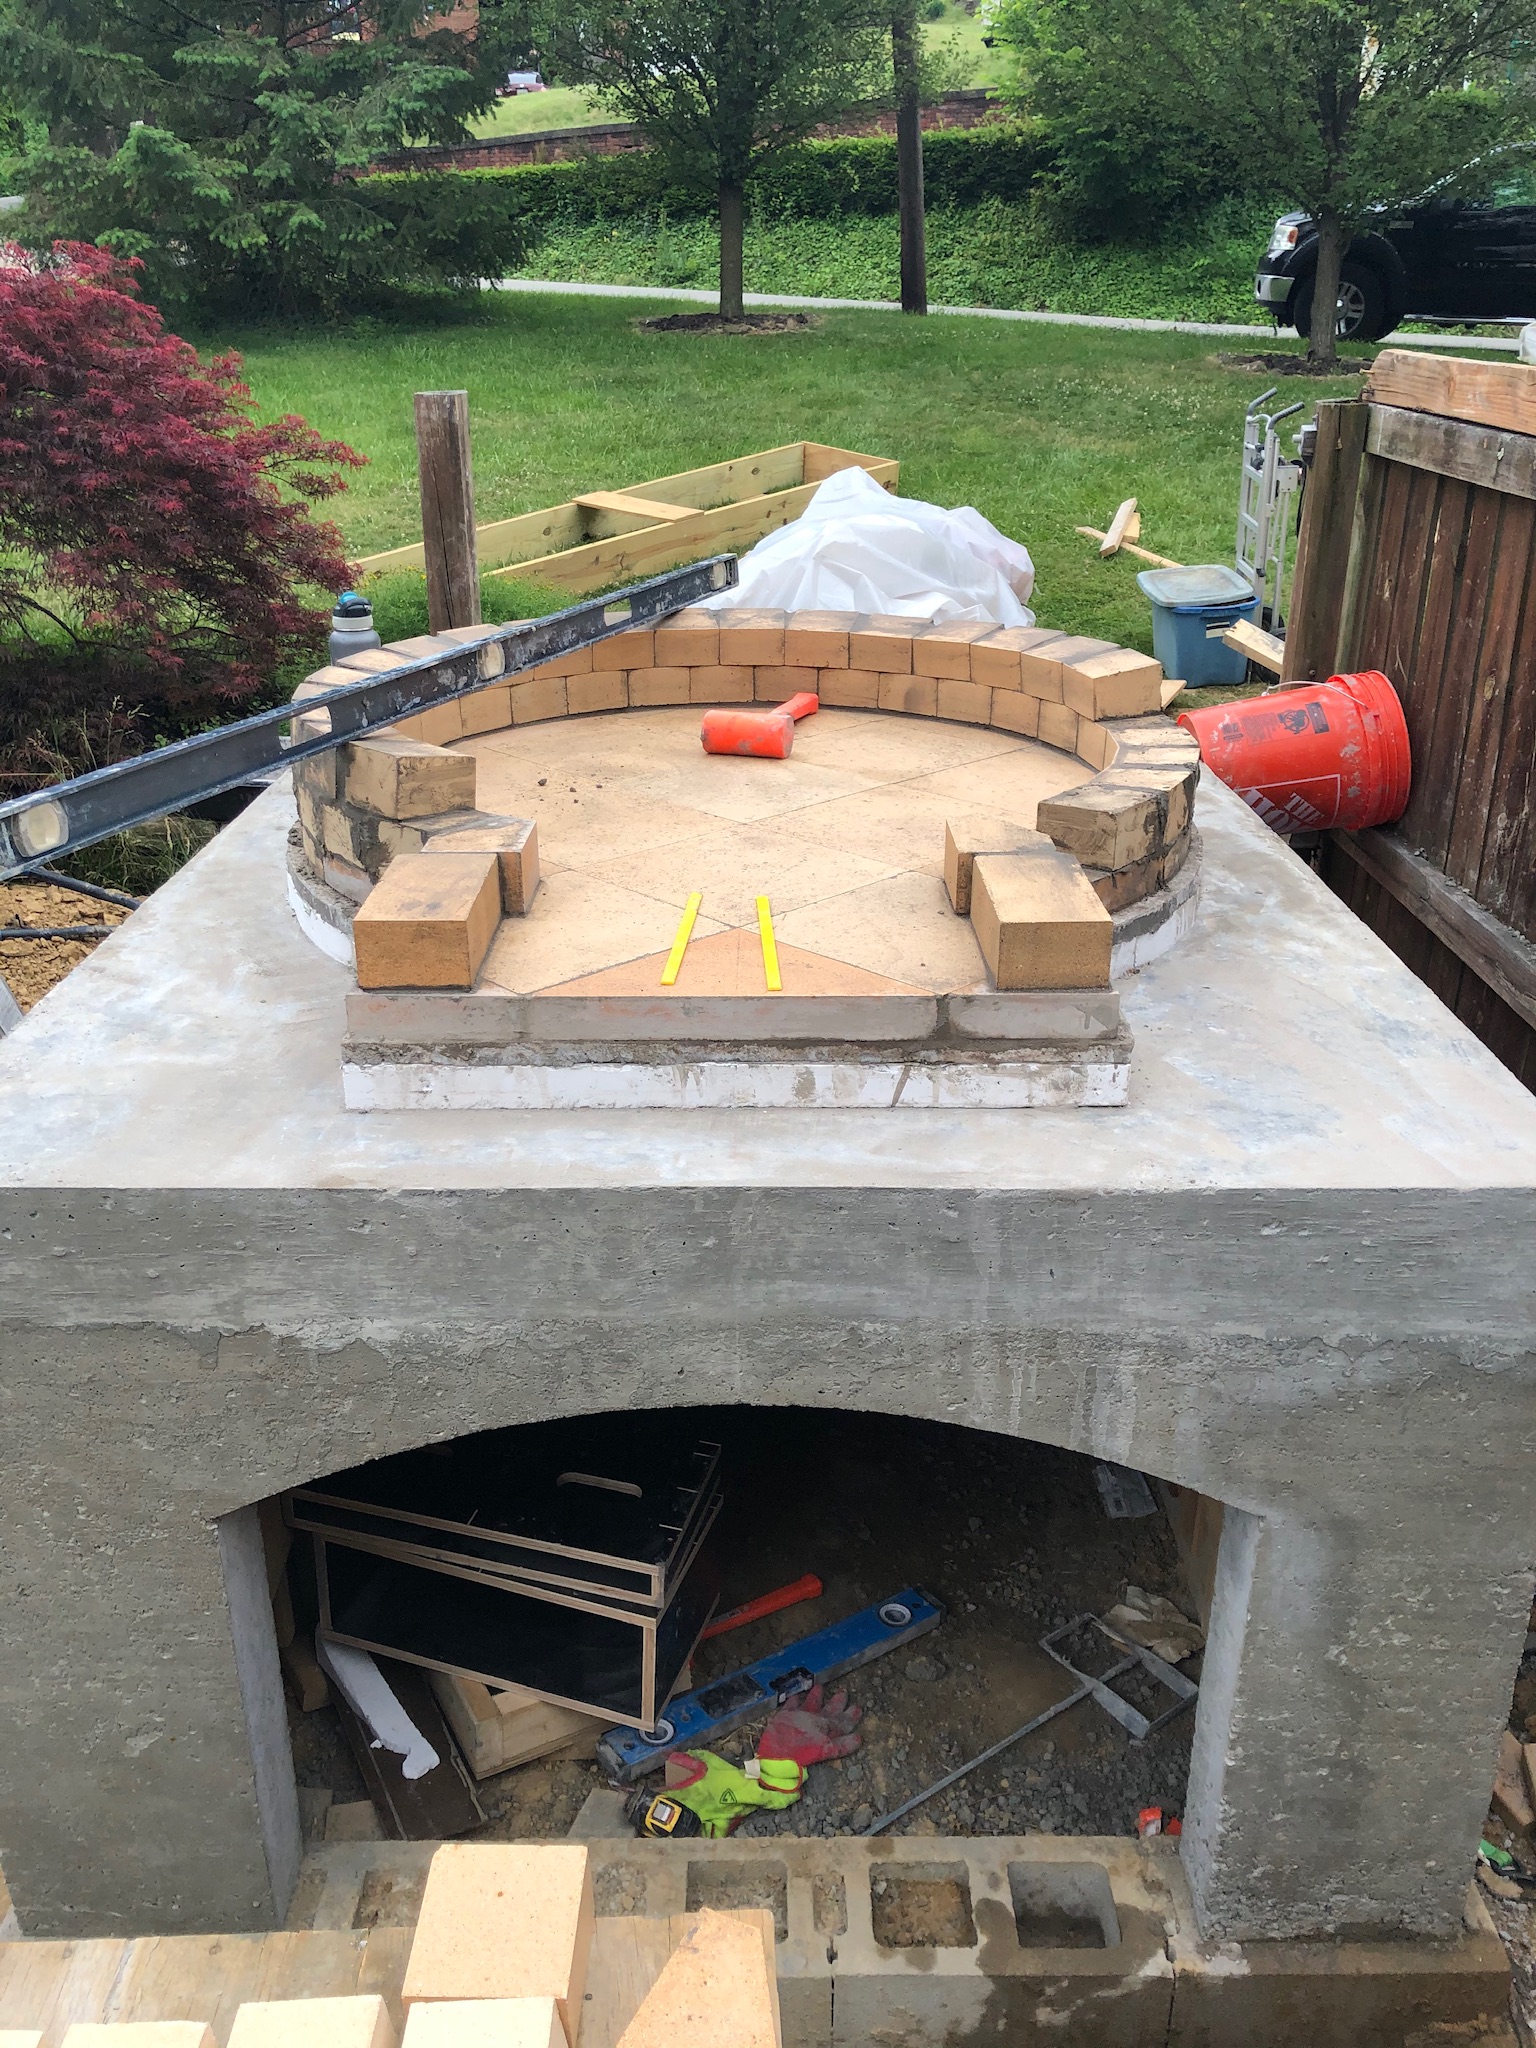
Wood Fired Oven Brickwork
text
Hearth Slab


Add comment